
The Underlying Philosophy of Climbing
One of the the things we’re working on in our game is the ability to maneuver the real world in a number of ways – one of those ways is ledge climbing. If I reach the edge of something that’s climbable, can I climb it? I identified a few conditions for ledge climbing:
- Anything should be climbable if it can be
- I don’t want to put scripts on “climbable” objects
- I don’t want to put climbable objects in a separate layer
- I don’t want to use a specific tag to identify climbable objects.
The Power of Visualization
Hence, I had to answer the fundamental question: “What is a climbable ledge?” I’m a big believer in the concept of visualization in game design for diagnosing what’s going on, so I started off with a simple system.
I used the Drawing Debug Extension plugin for actually drawing small arrows at runtime as part of my main loops rather than my OnDrawGizmos loop so that I could see what was going on. My initial step was to pick two spots in front of the player under my player’s hierarchy:.
From there, I interpolate 10 points in between them and then trigger 10 downward raycasts. If the raycasts hit something, I draw a red arrow. If the raycasts didn’t hit anything – I draw a green arrow. This is the approach I’ve taken for almost all of my raycast visualizers – and I’ve even got a fancy wrapper around Physics.Raycast that draws either red or green if it hit or didn’t hit something.

Here’s how our raycast function looks:
bool GizmoRaycast(Vector3 start, Vector3 direction, out RaycastHit hit, float distance, LayerMask layermask, Color hitColor, Color unhitColor, float time = 0)
{
	var didHit = Physics.Raycast(start, direction, out hit, distance, layermask);
	if (drawRaycasts)
	{
		D.DebugArrow(start, direction * (didHit ? hit.distance : distance), didHit ? hitColor : unhitColor, time);
	}
	return didHit;
}

bool GizmoRaycast(Vector3 start, Vector3 direction, out RaycastHit hit, float distance, LayerMask layermask, float time = 0)
{
	return GizmoRaycast(start, direction, out hit, distance, layermask, Color.red, Color.green, time);
}
And here’s how it looks in practice if we throw it onto an update loop:

Design Principles
Once my ledge detector initialized, I interpolated 10 points in between those two points and used those to trigger 10 downward raycasts. Here’s the overall thought process for how I approached the problem:
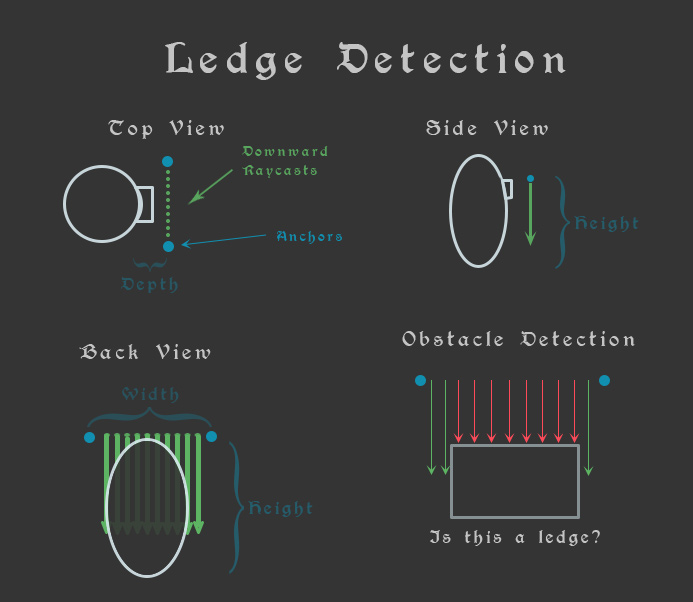
As the image above demonstrates, we have two anchor points that are somewhere in front of the player. We need to carefully consider how far apart from each other they are (WIDTH), and how high up they are from the Player’s position (HEIGHT), but also, how far out can the player grab a potential ledge (DEPTH).
Thus, perhaps we can go with the naive approach to get started: a ledge is when all of our raycasts hit something.
But as the last quadrant of that image suggests, what exactly constitutes a ledge? If a ledge is when “ALL OF THE RAYCASTS HIT SOMETHING” then maybe for that box, the width is too much. Easy – we constrain the width of the player’s grabbing spots. There also other considerations and things to think about:

Thus, there’s some questions that need to be answered – what actually counts as an “acceptable” ledge? Clearly a box or a flat plane is easy to detect – but should the player be able to climb a diagonal? What about a curved object, such a pipe, or an archway? What if there’s a slight gap between two objects that doesn’t affect the player at all, but the raycast goes in between them? What angle of a roof is climbable? If a roof is flat, that makes sense, but what if the roof is super steep? What about really thin ledges where the anchor points are raycasting down in front of the edge and the player doesn’t detect it?
Either way, we can tell that the naive approach isn’t going to be sufficient at ALL. There’s a lot of ways to address this, but for now, let’s talk about one of the simplest solutions I came up with. It’s not perfect by any stretch of the imagination, but it’s decent.
Standard Deviation
One possible approach is to decide if the spots that hit are within a specific standard deviation of each other. To do this, we need to compute all of the lengths and store them.
// Storage of the results of each raycast
// computed by the ledge detector
public struct LedgePoint
{
  public Vector3 topPoint;
  public Vector3 hitPoint;
  public bool hit;
  public float distance;
}

// We should store a list of these:
private LedgePoint[] = new LedgePoint[RESOLUTION];
Now, we need to fill out the values in the LedgePoint array. Currently, we’re doing it on collisions, but you could do it on every update loop if you wanted to pay the cost (which I would not recommend).
It might look something like this:
private void ComputeLedgeCollision()
{
	// For each one of the points, we should see if it has hit something.
	for (int i = 0; i < RESOLUTION; i++)
	{
		var p = Vector3.Lerp(leftSide.position, rightSide.position, i / (float)(RESOLUTION- 1));
		points[i].topPoint = p;
		HandleRayCast(i, p);
	}
}


private void HandleRayCast(int i, Vector3 p)
{
	if (GizmoRaycast(p, Vector3.down, out RaycastHit rh, downDistance, layers, 5f))
	{
		points[i].hit = true;
		points[i].hitPoint = rh.point;
		points[i].distance = rh.distance;
	}
	else
	{
		points[i].hit = false;
		points[i].distance = downDistance;
	}
}
Once we have this list of LedgePoints, we can process it for standard deviation.
private void ComputeStandardDeviation()
{
	var hitCount = 0;
	float total = 0;
	foreach (var p in points)
	{
		if (p.hit)
		{
			total += p.distance;
			hitCount++;
		}
	}

	averageHeight = total / hitCount;

	float totalVariances = 0f;
	for (int i = 0; i < resolution; i++)
	{
		if (points[i].hit)
			totalVariances += Mathf.Pow(points[i].distance - averageHeight, 2);
	}

	stdDev = Mathf.Sqrt(totalVariances / hitCount);
}
I’ve simplified the code a bit, but it’s more or less a Standard Deviation. If that Standard Deviation is larger than some magic number that you choose, you can account for variations in height on a ledge, but ensure that the variations are not too extreme.
This solves the problem of sloped ledges (ledges with a light slope still will work), staircases (assuming either a smaller step size or a larger std-dev threshold).
What’s left?
With this – we’ve ended up with a very naive approach to ledge climbing. If we detected “all” of the spots are red, and the standard deviation isn’t too wild, we can safely call this a “ledge” that we can climb. Clearly, there’s a lot more left to this actually working. We’ll go over this in future posts:
- Handling gaps (the split case)
- Facing the ledge (what happens if I hit the ledge at a 15 degree angle)
- Ledges with a really steep angle (Rooftop case)
- Validating the destination is reachable and the player can fit there
- Validating that the ledge points are visible and not behind a wall
- Scraping the raycasts forward until close to the player in order to find thin ledges
- Handling crouching into ledge climb destinations
- Computing hand positions for IK.
- Actually climbing the ledge.
We’ll go over the rest in future blog posts. See you there!